안녕하세요. VeriLog입니다.
당분간 Intel Realsense D435 카메라와 PCL (point cloud library)를 사용하는 방법들에 대해서 포스팅 하려고 합니다.
이번 포스팅에서는 먼저 Intel Realsense SDK 설치와 D435 카메라를 연동하는 방법에 대해서 배워보겠습니다.
먼저, 저의 환경 세팅입니다.
- OS: Windows 10
- 카메라: Intel Realsense D435
- Visual Studio 2017
- PCL Library: v1.9.1
- Intel Realsense SDK: v2.0
- 개발 언어: C++
1. Intel Realsense SDK download 및 설치
1) 아래 주소로 접속 후, "Windows 10.exe" 파일 다운로드
github.com/IntelRealSense/librealsense/releases/tag/v2.42.0
Release Intel® RealSense™ SDK 2.0 (v2.42.0) · IntelRealSense/librealsense
Supported Platforms Ubuntu 16.04/18.04/20.04 LTS (1) (Linux Kernels 4.4, 4.8 ,4.10, 4.13, 4.15, 4.16(4) , 4.18, 5.0, 5.3, 5.4) Windows 10 (Build 15063 or later) Windows 8.1 (2) Windows 7 (3) Mac ...
github.com
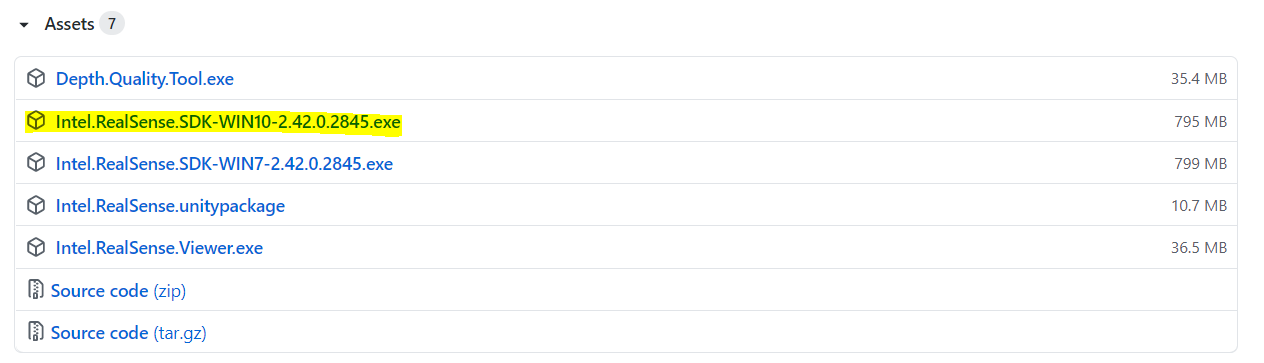
2) 다운로드 완료 후, 파일 실행 및 설치 진행
- Intel RealSense Viewer and Quality Tool은 카메라를 쉽게 연동해주는 툴입니다.
- Visual Studio에서 개발하고자 한다면 C / C++ Developer Package만 설치해주셔도 됩니다.

2. Visual Studio 설정
1) Visual Studio Project 생성 및 속성 시트 추가
- 새로운 C++ 프로젝트를 생성 후, "보기 > 다른 창 > 속성관리자"를 클릭
- Release 64에 기존 속성 시트 추가
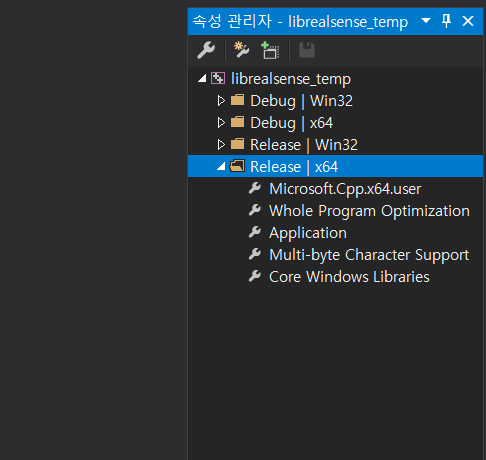
- "C:\Program Files (x86)\C:\Program Files (x86)\Intel RealSense SDK 2.0" 위치에 있는 glfw-imgui.props, intel.realsense.props, opencv.props 추가
(경로는 각자 환경에 따라 상이할 수 있습니다.)

- build Release x64로 변경

3. 코드 작성 및 테스트 진행
- 아래 코드 작성 후, 빌드 시 에러가 없다면 성공적으로 연동 된 것입니다.
#include <iostream>
#include <librealsense2/rs.hpp>

using namespace std;

int main(int argc, char** argv)
{

	// Declare pointcloud object, for calculating pointclouds and texture mappings
	rs2::pointcloud pc;
	// We want the points object to be persistent so we can display the last cloud when a frame drops
	rs2::points points;

	// Declare RealSense pipeline, encapsulating the actual device and sensors
	rs2::pipeline pipe;

	// Create a configuration for configuring the pipeline with a non default profile
	rs2::config cfg;

	//======================
	// Stream configuration with parameters resolved internally. See enable_stream() overloads for extended usage
	//======================
	cfg.enable_stream(RS2_STREAM_COLOR);
	cfg.enable_stream(RS2_STREAM_INFRARED);
	cfg.enable_stream(RS2_STREAM_DEPTH);

	rs2::pipeline_profile selection = pipe.start(cfg);

	rs2::device selected_device = selection.get_device();
	auto depth_sensor = selected_device.first<rs2::depth_sensor>();

	if (depth_sensor.supports(RS2_OPTION_EMITTER_ENABLED))
	{
		depth_sensor.set_option(RS2_OPTION_EMITTER_ENABLED, 1.f); // Enable emitter
		pipe.wait_for_frames();
		depth_sensor.set_option(RS2_OPTION_EMITTER_ENABLED, 0.f); // Disable emitter
	}

	if (depth_sensor.supports(RS2_OPTION_LASER_POWER))
	{
		// Query min and max values:
		auto range = depth_sensor.get_option_range(RS2_OPTION_LASER_POWER);
		depth_sensor.set_option(RS2_OPTION_LASER_POWER, range.max); // Set max power
		//sleep(1);
		depth_sensor.set_option(RS2_OPTION_LASER_POWER, 0.f); // Disable laser
	}

	return (0);

}
다음 시간에는 PCL과 연동 및 pointcloud로 실제 데이터를 확인하는 방법에 대해서 포스팅하겠습니다.
궁금하신 사항이 있으시다면, 댓글로 남겨 주세요.
'IntelRealsense & PCL' 카테고리의 다른 글
| Intel RealSense L515에서 데이터 추출하기 (11) | 2021.04.21 |
|---|---|
| PCL 설치 및 Intel Realsense 연동 (1) | 2021.04.21 |

